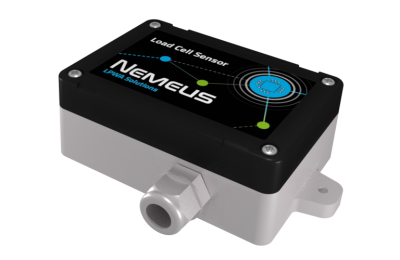
NIS-LC Load Cell Sensor
Contents
1 General information
1.1 Overview
- LoRa™ WAN 1.0.2 EU Class A & C
- Activation by Personalization (ABP)
- Over-The-Air Activation (OTAA)
- SIGFOX™ ready
- Fully certified on major LoraWan & Sigfox networks
- Easy to use and deploy
- 3.6V / 2200mAh Primary battery Li-SOCl2 embedded
- Magnetic switch and LED to ease the installation
- RoHS conform / Pre-Certified ETSI EN 300-220 / RED compliance under certification
1.1.1 RF Performance
- TX Power 14 dBm (25 mW)
- RX Sensitivity -137 dBm
- Approx. 10 km range
- Integrated PCB antenna
1.1.2 Environment
- Operating temperature -40°C to +85°C
- Storage temperature 30°C recommended (to limit battery self-discharge)
- Rel. humidity 0% to 95% (not condensing)
1.1.3 Options
- External antenna
- SDK for your SW development purposes
- 10-30V external power supply
- Compatible with the NEMEUS PicoGateway for private networks
1.2 Installation
By using the internal antenna, the position of the sensor is critical.
Install your product as high as possible, and prefer unobstructed area (concrete and metal are the worst materials).
If you cannot fulfill these conditions, it is still possible to use an optional external antenna.
2 Mechanics
- Dimensions 60 x 95 x 85mm (109mm including fixing brackets)
- 96mm spacing between brackets
- IP 65
- Solid ABS & PC material
3 Load Cell sensor properties
- Handles 4-wires and 6-wires load cells
- 24-Bit and ultralow Power Sigma-Delta ADC
4 Wiring
| number of wires | jumpers configuration | Probe connection |
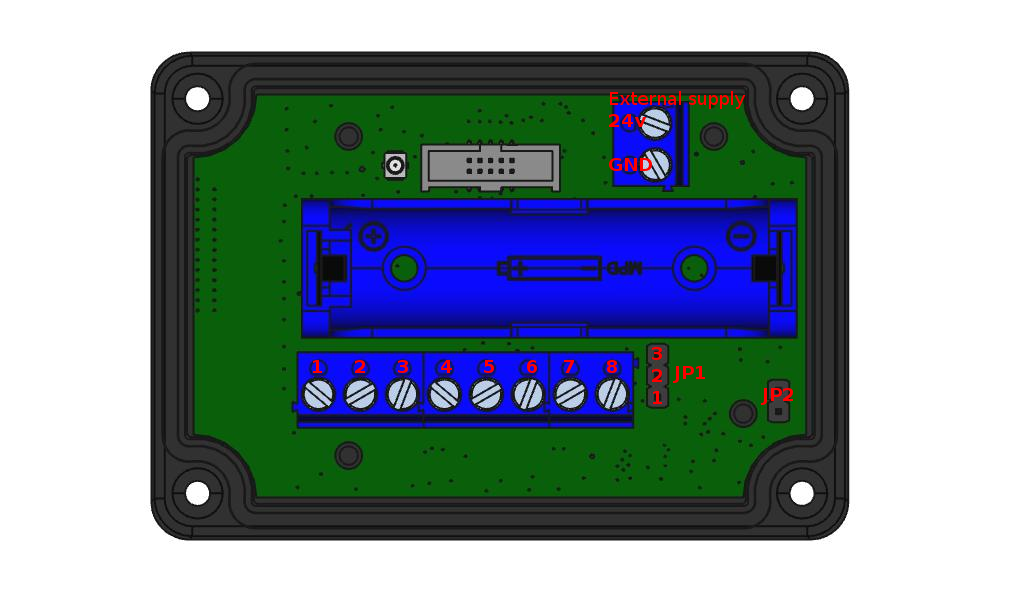
| 4 wires | JP1 and JP2 : NC | 1 : +Excitation |
| 2 : NC | ||
| 3 : NC | ||
| 4 : -Out | ||
| 5 : +Out | ||
| 6 : -Excitation | ||
| 7 : GND | ||
| 8 : GND | ||
| 6 wires | JP1 and JP2 : NC | 1 : +Excitation |
| 2 : -Sense | ||
| 3 : +Sense | ||
| 4 : -Out | ||
| 5 : +Out | ||
| 6 : -Excitation | ||
| 7 : GND | ||
| 8 : GND |
If your load cell comes with stranded wire, connect it to 7 or 8 (GND connection terminals). If you have subscribed to the option, connect your power supply to the terminal block as shown in the picture.
5 Magnetic Switch Protocol description
5.1 Generic Magnetic Switch Protocol description
Nemeus sensors embed a magnetic switch and a green LED to implement a simple man to machine interface.
The LED blinks every second while the magnet is present.
If the magnet is present during 20 seconds, it triggers an hardware reset.
The 20 seconds range has been cut in 10 timeslots of 2 seconds, the actions performed for each timeslot (TSX) are the following:
- 0s <= TS1 < 2s: read current state, number of led blinks indicates the following states:
- 1 blink: standby mode
- 2 blinks: joint with LoRaWAN network only (Sigfox is disabled)
- 3 blinks: Sigfox enabled only (no LoRaWAN)
- 4 blinks: joint with LoRaWAN network and Sigfox is enabled
- 6 blinks: joining LoRaWAN network (no Sigfox)
- 8 blinks: joining LoRaWAN network and Sigfox is enabled
- 9 blinks: measures are ongoing but transmission is forbidden
- 2s <= TS2 < 4s: switch to normal mode (if not already in normal mode) or force one measure and one Tx (if already in normal mode)
- 4s <= TS3 < 6s: switch to standby mode, it is the default mode when the device is stored and not yet activated
- 6s <= TS4 < 8s: perform a warm reset, the device resets and goes back to its previous mode
- 8s <= TS5 < 10s: forbid transmission, the device still performs measures but never transmit them
- 10s <= TS6 < 12s: switch to test mode, the device suspends the measures and forbid transmission, then it switches to continuous Rx on a specific channel and wait for test mode commands, if nothing is received after 60 seconds then it goes back to its previous mode. During test mode the led blinks and the magnetic switch is disabled.
- 12s <= TS7 < 14s: no action
- 14s <= TS8 < 16s: no action
- 16s <= TS9 < 18s: no action
- 18s <= TS10 < 20s: no action
- 20s <= TSHw: hardware reset
When the magnet is removed, the LED blinks fast X times, X identifies the timeslot (1 to 10).
5.1.1 Standby mode
It is the default mode set in factory, the device does nothing and consumes few µA (consumption depends on the sensor type).
5.1.2 Normal mode
The first time the device switches to normal mode, it performs the join procedure with the LoRaWAN network.
Then it performs a first measure and transmits it to the network whatever the number of measures required to trigger a transmission.
Finally it performs measures according to the configured period and transmits them according to configured number of measures required to trigger a transmission.
5.1.3 Forbid transmission mode
In this mode the device performs measures according to the configured period but never transmits them to the LoRaWAN network. This mode is mainly used in R&D phase to tune the measure algorithm, it shouldn’t be used when the device is deployed.
5.1.4 Test mode
This mode is used to modify the device configuration over the air using a Nemeus tool, this tool must be in the vicinity of the device. A security key is used to authenticate the Nemeus tool and the device.
5.1.5 Warm reset
The warm reset restarts the device and put it in its previous state. For example, if the device was joining the network, it restarts its join procedure. If it was already joint and performing periodic measures then it transmits the first measure and restarts the periodic measures.
6 Radio frames description
6.1 Generic Application Protocol description
6.1.1 Nemeus uplink protocol
Nemeus uplink protocol is used to send sensor data to application server. The payload contains the following fields:
- <mask>: At least 1 byte containing a bit field identifying the fields included in the frame. The meaning of the mask is specific to the couple device/port. Thus, the application server knows the mask meaning according to the data profile linked to the couple device/port. The most significant bit of the <mask> is used to extend the mask on the next byte: 1 means not extended (mask is on 7 bits) and 0 means extended (mask is on 14 bits). When extended, the following byte can also be extended according to its most significant bit. When the <mask> field is on several bytes, it is encoded in little endian (LSB first). For example, a <mask> coded on 2 bytes like “00100001 11001100” will be on 14 bits: “10011000100001”. Each bit indicates the presence/absence of a field. When a field is present, it appears in the frame according to the bit position (beginning with the least significant bit).
- <field1>: first data field identified by the data profile linked to the couple device/port.
- …
- <fieldN>: last data field identified by the data profile linked to the couple device/port.
6.1.2 Nemeus downlink protocol
Nemeus downlink protocol is used to exchange commands between application servers (located in network infra or in configuration PC) and sensor embedded applications.
Application port is used to address an application (application ports are bound with LoRaWAN ports). Thus, the protocol consists in a binary payload exchanged on a port. The payload contains the following fields:
- <cmd>: 1 byte identifying an applicative command/response.
- <mask>: At least 1 byte containing a bit field identifying the fields included in the frame. See uplink protocol above for description.
- <field1>: first data field identified by the data profile linked to the couple device/port.
- …
- <fieldN>: last data field identified by the data profile linked to the couple device/port.
Most significant bit of <cmd> field specifies if response is expected by the server or not (commands of type “set” doesn’t require any answer, especially when radio interface is used).
<cmd> values are defined for each application port (e.g. <cmd> value 0x01 has a different meaning on port 1 than on port 2).
A response reuse the same <cmd> as the received command, except the most significant bit which is forced to 0 (because a response doesn’t expect any response). The response <mask> indicates which fields of the command have been actually processed.
When a parameter type size is more than one byte, it is encoded in little endian (LSB first).
Downlink command may be received either from network application server or from PC configuration tool through AT command.
The generic application AT command is used:
AT+GA=DIND,<port>,<hexpayload>.
6.2 Uplink data Frame format
The uplink payload contains multiple fields: <mask>: bit field on 1 byte indicating the presence of other fields. Bit 7 is always to 1 because the mask is never extended on next byte.
Some examples (in hexadecimal):
“820119”: the frame indicates
6.3 Downlink Frame format
The sensor configuration contains the following fields:
<up_frame_mask>: the mask identifying the different fields present in uplink frames (possible values are described in “Uplink data Frame format” section)
The downlink frame has the following format:
<cmd>: 1 byte containing WRITE_CFG_CMD=0x02
6.4 Power consumption
Power consumption calculator based on the number of measurements and transmissions.

